Raised Bed Soil Compacted? How to Free Up Restricted Roots
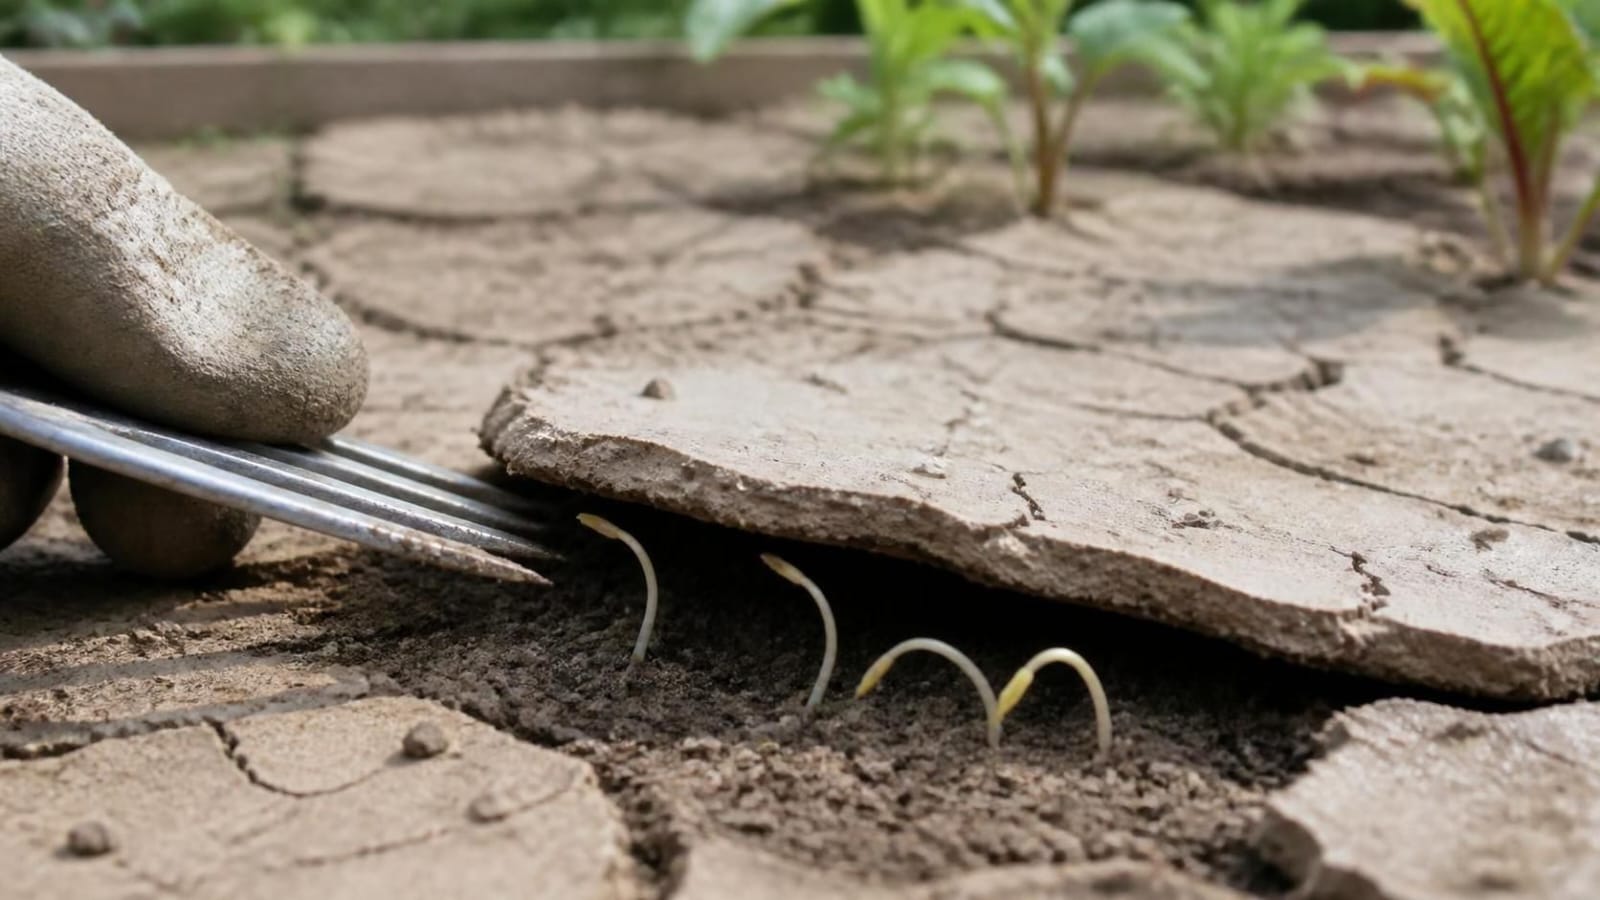
The first season in a new raised bed can feel like cheating. The mix is dark and springy, seedlings shoot up, and roots seem to go wherever they like. By the second or third year the picture can change. Water sits on a hard crust, a trowel bounces off the surface, and plants that thrived before stall for no obvious reason.
That slow tightening is soil compaction, and a raised bed is not immune. Below you will find how to confirm it, how to tell it from problems that look the same, and how to loosen the bed without wrecking the soil life you have built up.
Compaction means the soil particles have been pressed together until there is too little room left for air and water, so roots cannot push through. In raised beds it usually comes from the mix breaking down and settling, pressure from feet or tools, rain and watering hitting bare soil, or a hard layer under the bed. Confirm it with a probe and a look at the roots, then loosen the bed without turning it over, add compost, cover the surface, and keep your weight off the growing area.
First, make sure it is compaction
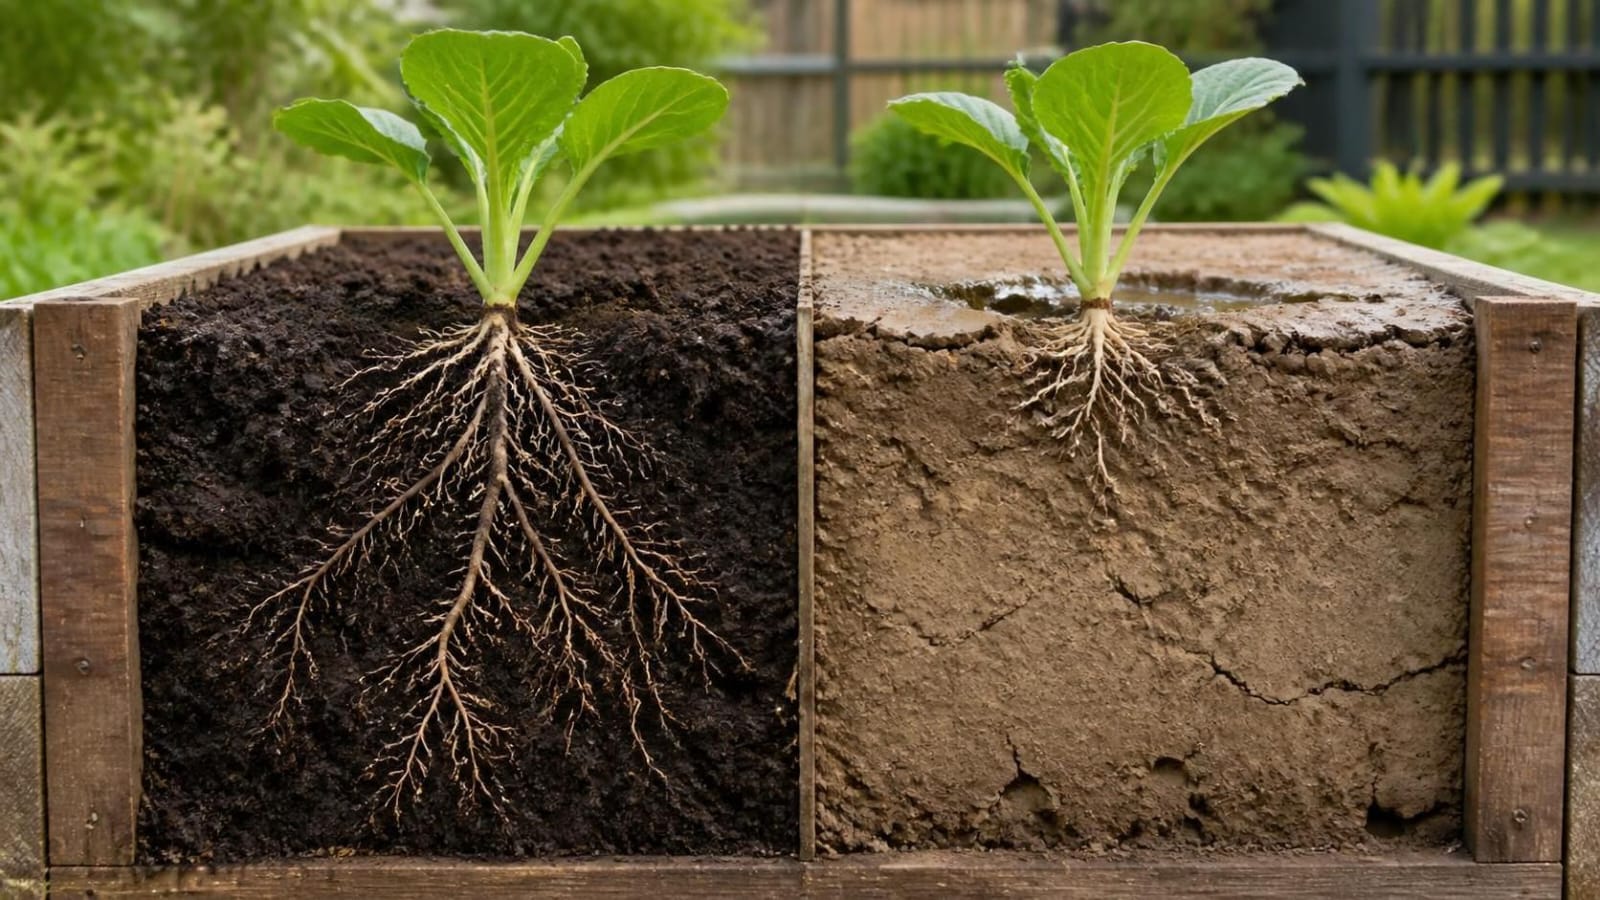
Healthy soil is roughly half pore space, the little gaps that hold air and water around the roots, according to the University of Delaware Cooperative Extension. In compacted soil those gaps are squeezed shut. Roots cannot penetrate to find water and nutrients, drainage slows, and the lack of air makes things worse. Colorado State University Extension describes the end result as a dense, massive structure with poor infiltration, replacing a crumbly one.
The catch is that other problems produce similar signs. The Delaware fact sheet itself warns that compaction can be hard to detect because its symptoms overlap with other site problems. It is worth ruling out the look-alikes before you spend money or dig anything up.
| What you notice | What it may be | How to check | What to do |
|---|---|---|---|
| Water puddles or runs off, with a hard crust on top | Surface crust | Scratch the top inch. If water then soaks in quickly, the problem is shallow. | Break the crust gently, add a thin layer of compost, then mulch. |
| A rod or trowel barely goes in a day after watering, and roots are short, stubby or turn sideways | Compaction in the root zone | Probe several spots, then dig a small hole and see where the roots stop. | Loosen with a fork, add compost and protect the surface (see the fixes below). |
| Soil sits well below the rim of the frame but feels soft and crumbly | Settling as organic matter breaks down | Measure the drop from the frame, then probe. Soft soil points to settling, not compaction. | Top up with compost or a bed mix. No digging is needed. |
| Slow drainage at depth, a sour smell, yellowing lower leaves | Waterlogging above a dense floor or a closed base | After watering, dig a hole down to the base and see whether water stands at the bottom. | Fix the drainage or loosen the ground beneath. Loosening only the top will not help. |
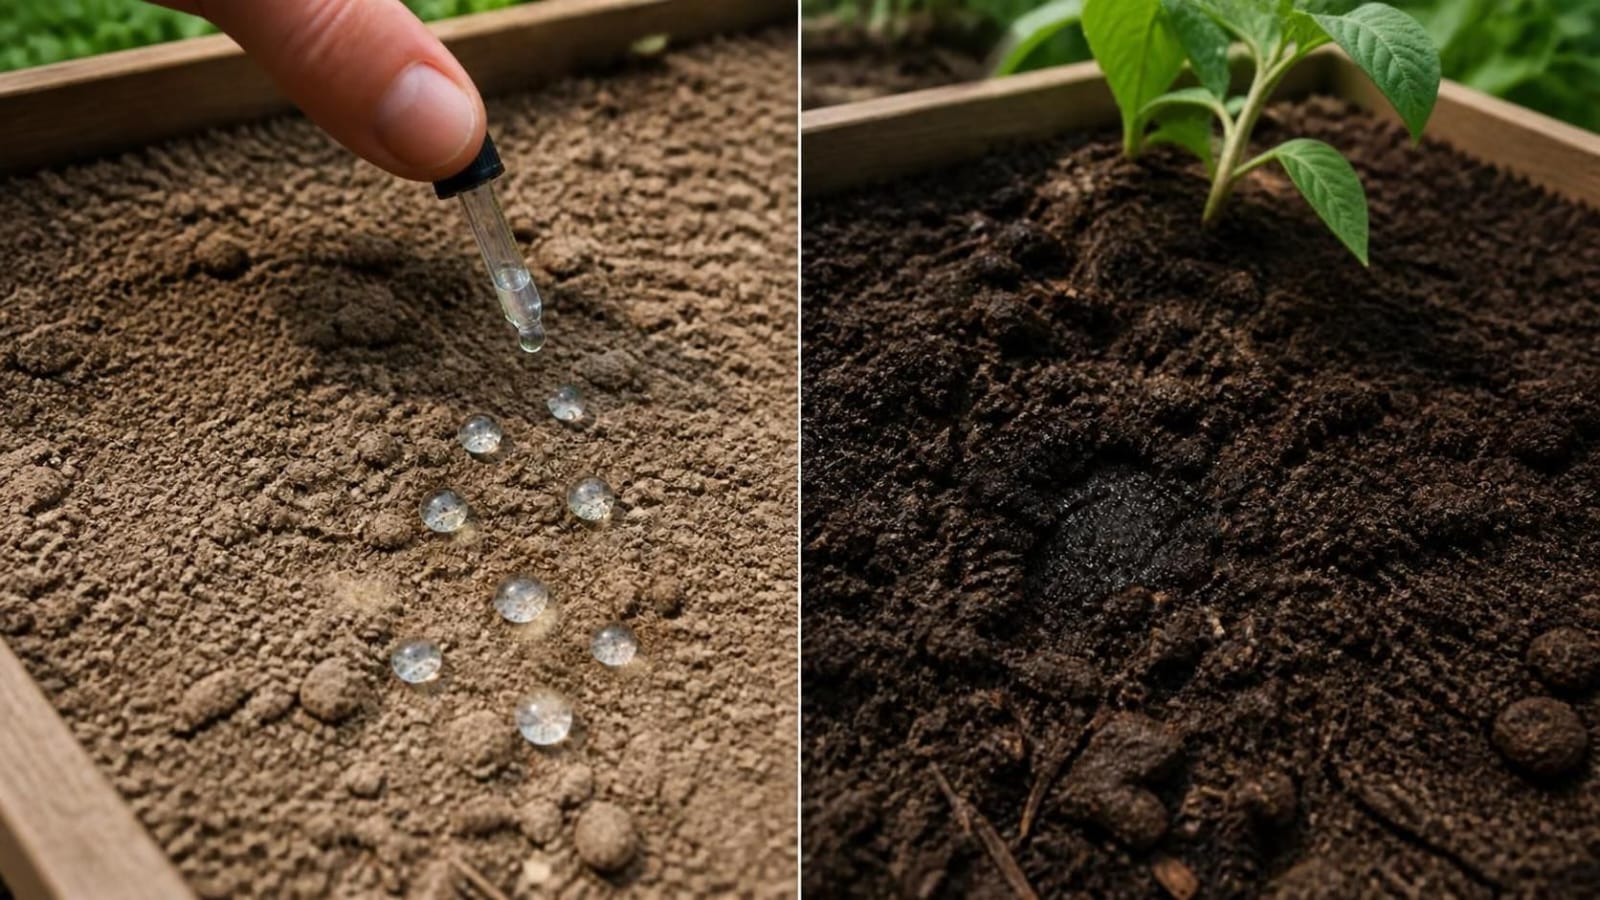
| Water beads up or runs down the edges of a dry, peaty mix | Water-repellent dry mix | Water slowly and pause. If the mix soaks up after a few passes, repellency was the cause. | Rewet in several slow passes, then add compost and mulch. |
| Pale, slow plants, but the soil probes easily and roots look normal | Low fertility rather than compaction | Roots grow freely in the probe test. A soil test can confirm nutrient levels. | Feed the soil with compost and follow any soil test recommendations. |
Test 1: the probe
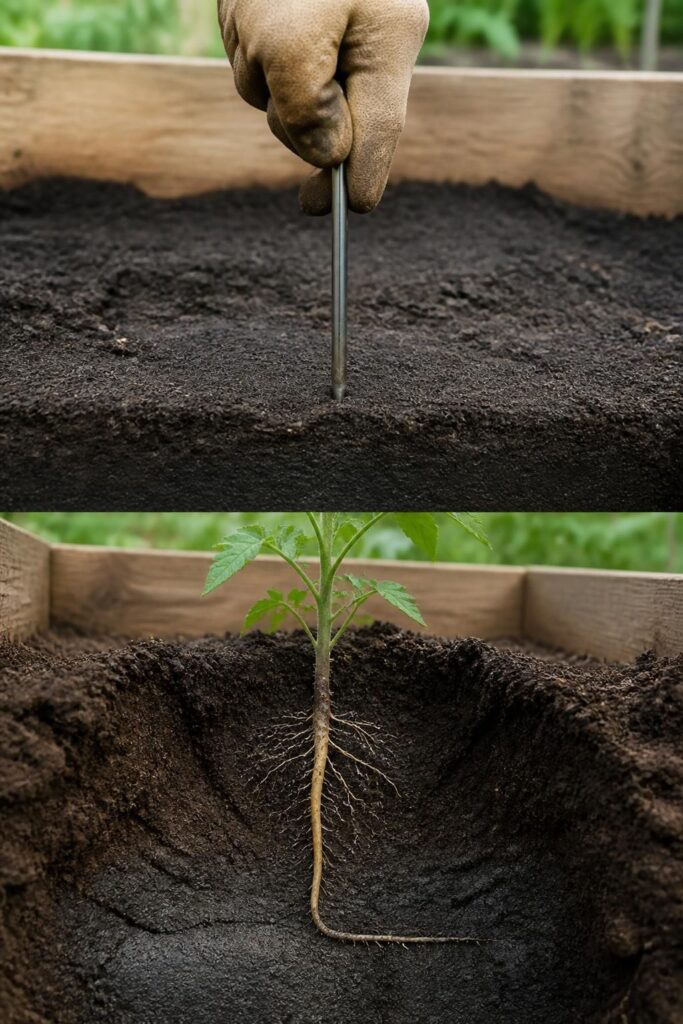
The easiest home test, according to the Delaware fact sheet, is to push a soil probe or a hollow metal pipe into the ground. A long screwdriver or thin metal rod does the same job. If it barely enters, the soil is compacted. Do it a day after watering, because bone-dry soil resists a rod even when its structure is fine. Test the middle of the bed, the edges, and a spot near the walkway, and compare them.
Test 2: the roots
Dig a small hole beside a struggling plant and follow its roots. The Delaware sheet lists enlarged, stubby or twisted roots, and taproots that grow horizontally, among the signs. A taproot that dives down and then turns sideways at a certain depth is telling you where the hard layer starts. Carrots, parsnips and other deep-rooted plants tend to show it first.
Test 3: the water
Pour water slowly onto a small patch and watch. Soil in good shape takes it in steadily. If it puddles or slides off to the edges, scratch the top inch with a hand cultivator and try again. If that fixes it, you are dealing with a crust and can start with a light, quick repair instead of a full renovation.
Why raised bed soil compacts
Raised beds are filled with loose mix, so compaction can seem unlikely. Several things work against that loose structure.
The mix shrinks as it breaks down
A fresh bed mix is full of compost and other organic material. Soil microbes consume it, the chunky pieces become fine particles, and the air pockets between them collapse. The bed settles, and what is left is denser than what you started with. Mixes heavy in fresh compost tend to settle fastest, while woody material keeps its shape for longer.
Feet, knees and tools
Colorado State Extension points to foot traffic as a major source of compaction in garden beds, and adds that raised beds with established walkways avoid it in the growing area. The catch is that a bed too wide to reach across invites you to step in. Many gardeners use about four feet as the widest bed that can be worked from the edge, though that is a rule of thumb rather than a measured limit.
Rain and watering on bare soil
Raindrops and hard water streams knock fine particles loose, and those settle into the gaps below. The Delaware fact sheet calls this splash erosion and says it forms a thin surface crust that blocks water from reaching roots. It recommends a layer of plants or 2 to 3 inches of mulch to prevent that.
Working the soil while it is wet
Wet soil compresses easily, and digging in it can ruin its structure. Colorado State advises never cultivating clay soil when it is wet, noting that clods made that way can last for years. Delaware gives a practical test: if the soil holds its shape when pressed into a ball, it is too moist to dig or till. The University of Nebraska-Lincoln gives the same advice about driving, walking on and working wet soil.
The ground under the bed
If your bed has no bottom and sits on hard native soil, the roots may be fine in the mix and then hit a wall at the bottom. Probe through the bed: if the rod slides easily through the mix and then stops dead, the floor is the problem. Colorado State’s guidance is to break up compaction in the ground before placing new material over it, and that applies when you build or rebuild. Dense ground can also hold water in the bed, which is the waterlogging case in the table above.
How to loosen it, depending on where you are in the season
When plants are growing in the bed
You cannot lift everything out mid-season, so the aim is to open channels without tearing roots. Push a garden fork or broadfork straight down between plants, keeping well away from stems. Wiggle the handle slightly and pull it straight back out. Do not lever it or twist it. Then spread a thin layer of compost over the surface, water it in gently, and cover it with mulch so the surface does not seal again. Skip the rototiller. The Nebraska extension guidance cautions against over-tilling, especially with a rototiller, because it breaks down soil aggregates.
When the bed is empty
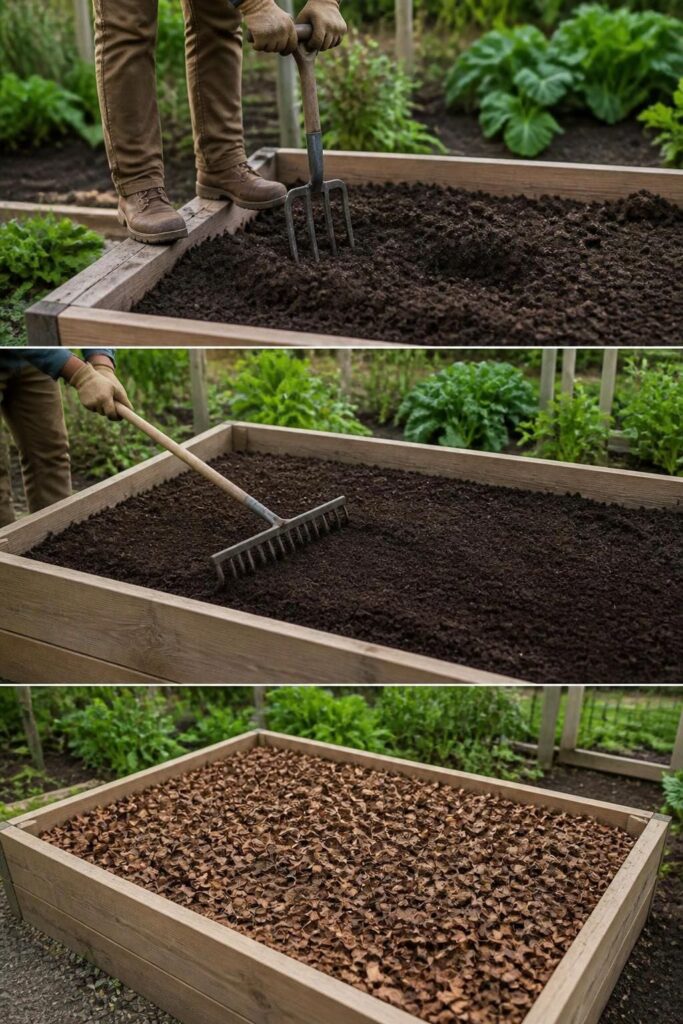
Between crops is the time for real repair. Wait until the soil is no longer muddy, then work through the whole bed with a broadfork or garden fork, rocking it back to lift and crack the hard layers rather than flipping the soil upside down. Keeping the layers in place helps preserve the soil life that has built up in them.
Then add organic matter. The Nebraska guidance suggests spreading a 2 to 3 inch layer of compost and working it in about 6 inches deep, and Colorado State likewise recommends working amendments into the top 6 to 8 inches. Fork it in gently rather than churning it. Finish with a few inches of mulch such as shredded leaves or straw. If the bed has sunk a long way, top it up with a blend of compost and soil. Straight bagged garden soil often has a lot of peat that will pack down again within a year or two.
Where perlite, sand and grit fit
Opinions differ here. Many raised bed guides suggest mixing in perlite at roughly one part to four parts soil, since it does not decompose and keeps air spaces open. The Delaware fact sheet is more cautious about inorganic amendments in general. It says they are inefficient and expensive compared with organic matter, that large amounts are needed to make a difference, and that adding too little can make things worse, as sand plus clay makes something close to concrete. If you do use a coarse material, it advises using consistently coarse-grained particles, because fine ones inhibit drainage. A sensible order is compost first, with perlite or coarse grit as an optional extra.
Let roots do some of the work
Cover crops sown after harvest send roots down through hard layers, and when they die those roots leave channels and add organic matter. Daikon radish, cereal rye and clover are the usual choices in raised bed guides, and the Nebraska extension article lists green manures and cover crops as a way to build organic matter in vegetable gardens. Cut them at the base in spring and leave the roots in place.
When to rebuild instead
Sometimes the better choice is to start over. Consider it if roots still cannot get below the top few inches after a full season or two of proper loosening and compost, or if the soil smells sour and squeezes into a dense, slick ball that will not crumble. Empty the bed, loosen the ground underneath, and refill with a coarse, compost-rich mix.
What not to do
- Do not rototill an established bed. It breaks down soil structure and can leave a dense layer just below the tilling depth.
- Do not work the soil when it is wet. Wait until a handful crumbles instead of holding its shape.
- Do not add sand on its own. Without enough of it, and without plenty of organic matter, it can make the soil harder.
- Do not leave freshly loosened soil bare. The next rain will seal the surface again.
- Do not step on loosened soil. One trip across the middle can undo hours of work.
What to expect after the fix
A crust can respond within a watering or two once you break it and cover it. Rebuilding structure is slower, because it relies on compost, roots and soil organisms doing their work, and it usually takes a season or more of steady care rather than a single weekend. Look for water soaking in instead of pooling, a probe that goes in with less effort, and new roots that reach deeper than before. Until then, expect long-rooted crops to struggle more than shallow leafy ones.
Keeping the bed loose from here on
- Reach from the edges, and lay a board or stepping stones across any bed that is too wide to reach over.
- Add compost every year. One to 2 inches is a common maintenance amount, and a bed that has sunk or hardened may take more.
- Keep the surface covered with 2 to 3 inches of mulch, as Delaware recommends.
- Water at a gentle pressure and low to the ground, so droplets do not pound the surface.
- Sow a cover crop in any bed that would otherwise sit bare through winter.
- Avoid pure peat-based mixes when filling or topping up. They compress and can turn water-repellent when dry.
Quick answers
Can I till a compacted raised bed?
It is better not to. A garden fork or broadfork opens the soil without destroying its structure, and tilling, especially with a rototiller, breaks down the aggregates that hold the soil open.
Why is my raised bed hard even though nobody walks on it?
Settling of the mix, a crust formed by rain and watering, and repeated wetting and drying can all tighten it. A mix with too many fine particles and too little coarse material is more likely to do this.
How much compost should I add?
For repair, 2 to 3 inches worked into the top several inches is the usual starting point. For yearly upkeep, a thinner layer is often enough. Use finished compost, and check what suits your soil and climate with your local extension office.
Should I replace the soil or amend it?
Amend first if the bed still has decent depth and the soil crumbles when squeezed. Replace it if the soil smells sour, stays dense and slick, or roots still cannot penetrate after a season or two of proper work.
Does the bed need to be a certain depth?
It depends on the crops and on what lies beneath. A bed on hard ground has less usable depth than its frame suggests, because roots stop where the loose soil stops. Loosening the ground beneath the bed gives them more room.