
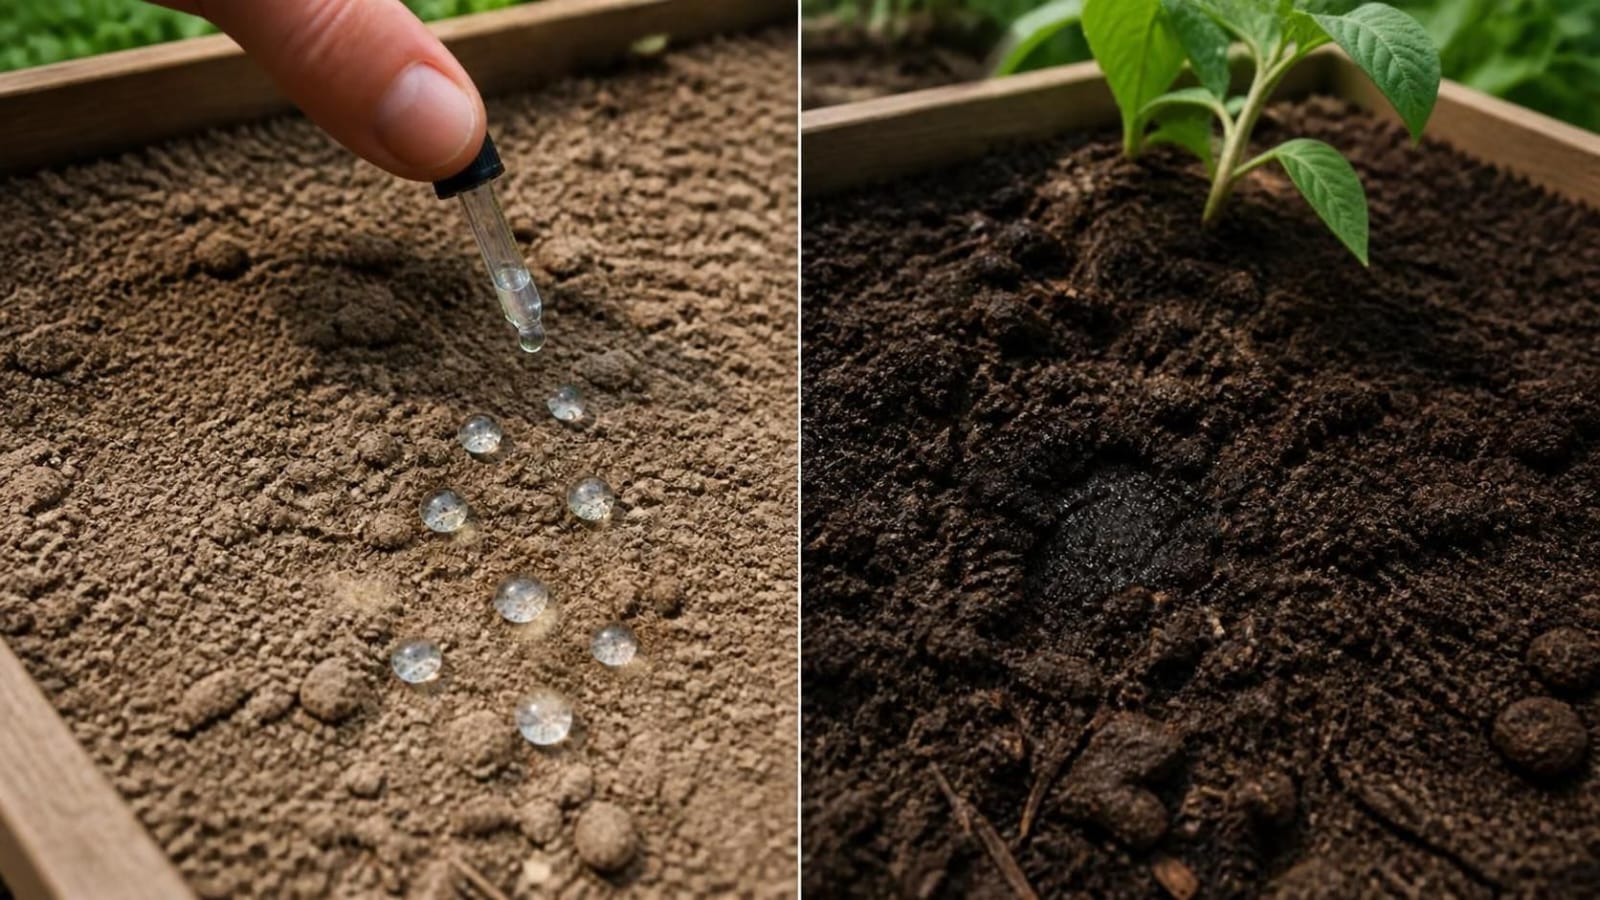
You turn on the hose, and the water does not sink in. It beads up, skates across the surface, and slips down the gap along the board. Ten minutes later you push a finger in and find dust an inch below a surface that looks damp.
In most raised beds this is water-repellent (hydrophobic) soil. Sometimes something else is going on, and the fixes differ, so it is worth confirming before you change anything.
The short version: confirm the problem with a water-drop test, rewet the bed slowly rather than forcefully, and stop the fill from drying out completely again. A wetting agent can help, but it does not replace consistent moisture.
Start with a two-minute test
Pull back any mulch and place a few drops of water on bare soil. Healthy soil takes up the drop almost at once. If the drop is still sitting there after about a minute, the soil is repelling water rather than draining slowly.
Then test deeper. The surface can wet normally while a repellent layer sits just below, so scrape down a few inches and repeat the drop test on the freshly exposed soil. Test in several spots. Repellency is often patchy, with a dry corner next to a bed that behaves normally.
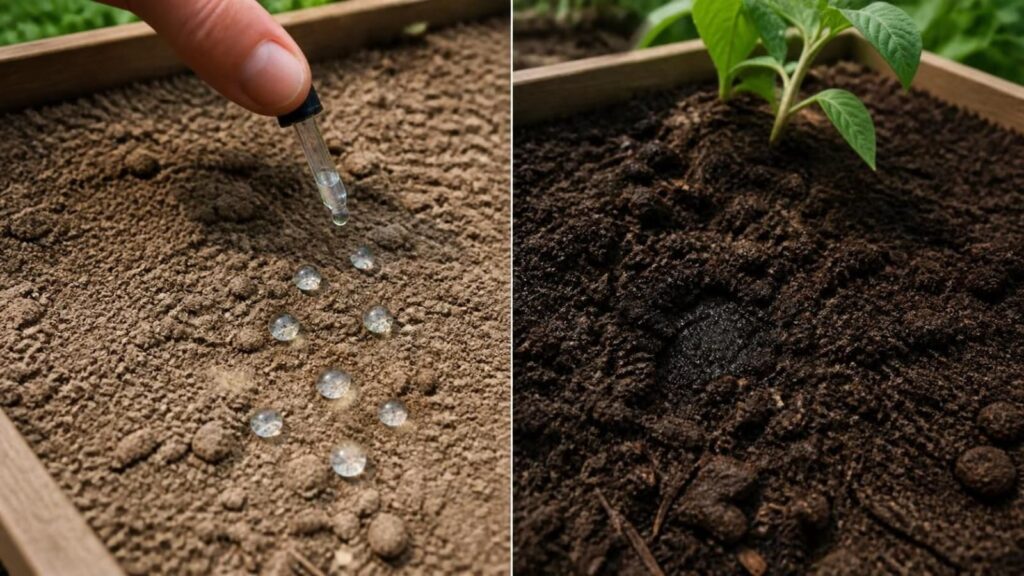
Other clues point the same way. Dusty, dry soil that won’t hold together when squeezed, water that runs off quickly, and soil pulling away from a container’s edges are all common signs.
Is it really hydrophobic? Ruling out the lookalikes
Several problems make water run off or pool, and they are easy to mix up. Crusting, compaction and hydrophobic soil are the usual suspects, and sometimes water is simply arriving faster than the soil can take it.
| What you see | More likely cause | How to confirm |
|---|---|---|
| Drops bead up and hold their shape on dry soil | Water repellency | The drop test above |
| A hard, plate-like skin, often after rain | Crusting | The skin breaks with a fingernail, and soil under it wets normally |
| Water pools and stays, even on moist soil | Compaction or poor drainage | Soil feels dense and heavy when damp, and a drop soaks in slowly but does soak in |
| Water runs off only when the hose is at full blast | Application rate too high | The drop test passes, and a gentle trickle soaks in fine |
| Mulch stays dry beneath while soil below is moist | Matted mulch shedding water | Lift the mulch, and the bare soil takes water |
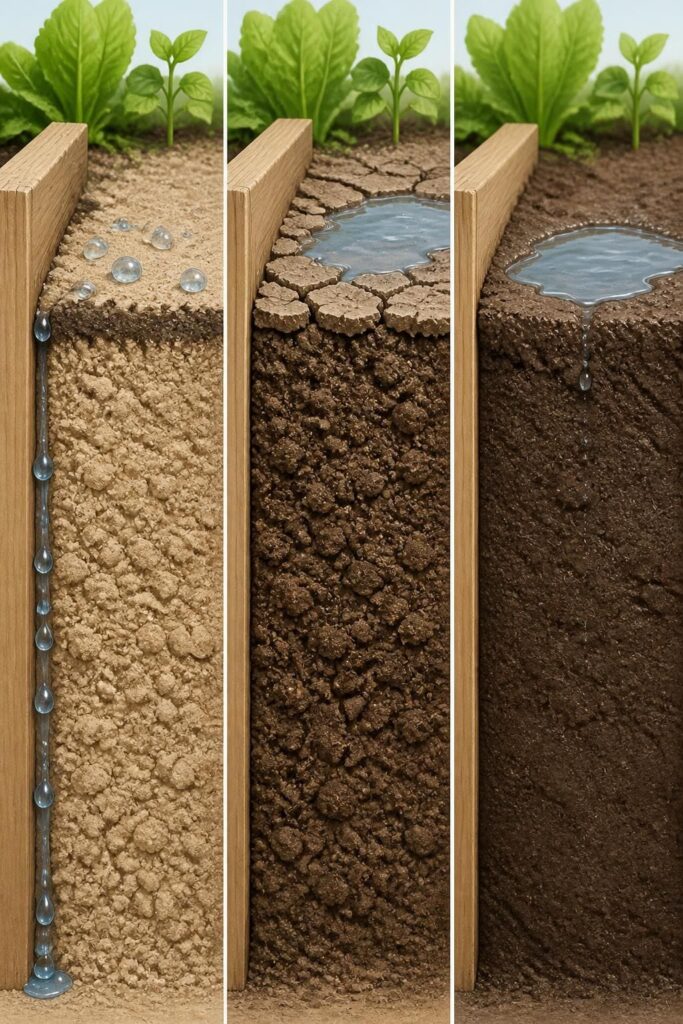
Crusting creates a physical seal on the surface, whereas hydrophobic soil repels water at the level of individual particles. Water-repellent soil is also always dry. But not all dry soil is repellent: dry soil simply needs moisture, while hydrophobic soil has lost its ability to take water in and needs slower, more deliberate rewetting.
What is happening inside the soil
Hydrophobic soil begins with a very thin coating. Waxy organic compounds coat the soil particles, which can come from fungal activity or from decaying plant matter such as waxy, resinous or oily leaves. Water meeting that coating behaves much like water meeting wax.
Soil microbes normally break those compounds down. When a bed dries out for long periods, microbial activity drops, decomposition slows, and the waxy layer builds up. That is why the problem tends to show up after a hot, dry spell, a holiday when nobody watered, or a stretch of light sprinkling that never soaked the root zone.
Why raised beds get it so easily
Raised beds combine several risk factors:
- The fill mix. Bagged raised-bed and potting mixes often lean heavily on peat. Peat holds water well, but once it dries out it is very hard to rewet. Soilless mixes tend to repel water when dry. One extension answer about a raised bed filled with bagged potting mix described exactly this: the surface looked wet while the soil just underneath was dry, and the specialist noted that the more peat in the mix, the more acute the problem.
- Fast drying. Raised beds and containers dry out faster than in-ground beds. Sun, wind and free drainage on all sides pull moisture out quickly.
- Sandy or low-organic-matter fill. Sandy soils dry fast and have little organic matter to buffer them. They are among the most prone to becoming water-repellent.
- Edge gaps and channels. As the soil dries and shrinks, it pulls away from the frame. Water then races down the gap or through cracks and leaves much of the root zone dry. This is why a bed can drain freely and still be dry.
- Sharp layers. A very different fill on top of, or under, another one can disrupt how water moves. Extension guidance warns against heavy topdressing, poor mixing and other practices that create distinct layers.
If you are unsure what your bed is made of, squeeze a handful of moist soil. A very light, fibrous, springy mix points to a lot of peat or bark. A gritty, loose one suggests sand.
How to rewet a hydrophobic raised bed
The aim is to get water to actually contact the particles, which takes time more than force.
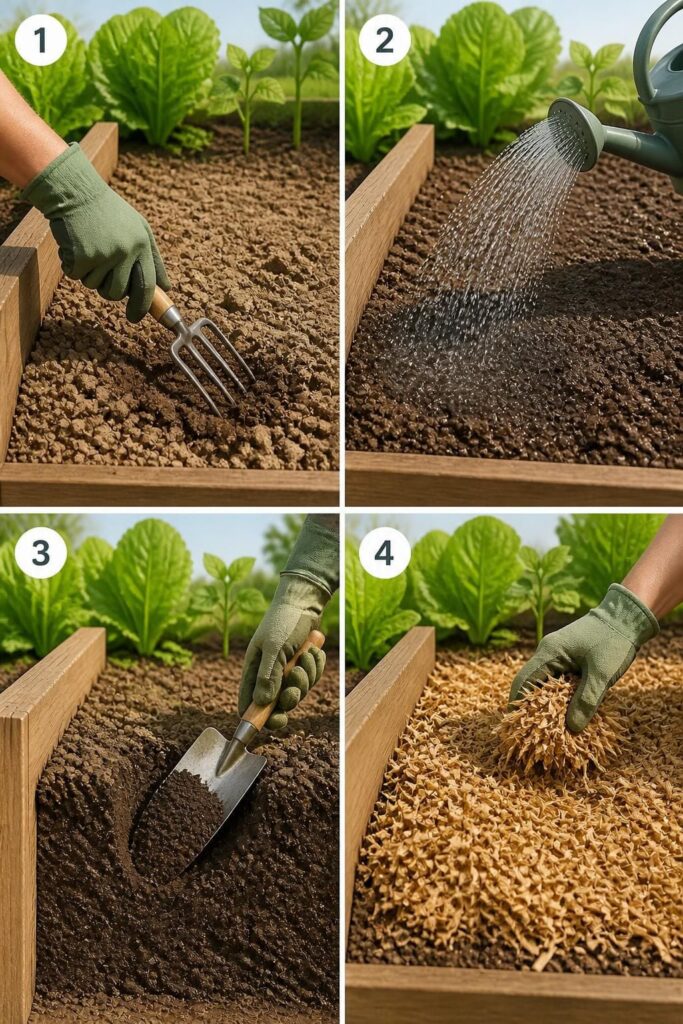
1. Break the surface and slow down. Loosen the top couple of inches lightly with a fork, then water with a gentle stream or a soaker hose. A slow soaking rain, drip irrigation, soaker hose or gentle watering over a longer period will often restore normal absorption. A hard jet just bounces off the surface and runs to the edges.
2. Water in short rounds, not one long blast. Apply a little, pause for the water to work in, then apply more. Repeat several times, and stop if you see runoff. Adjust this to how your bed responds.
3. Check depth. After watering, dig down and confirm the moisture reaches the root zone, not just the top inch. If the deeper soil is still dry, repeat the process over the next day or two. Deeply repellent beds often need several sessions.
4. Rewet unplanted bagged mix in a container first. Before planting, if the mix is dry, tip it into a wheelbarrow or bucket and wet it thoroughly by hand. Extension guidance suggests working water into soilless media with your hands until it is thoroughly wetted. One extension specialist suggested hot water for the first wetting of peat-based potting mix, and blending it with garden soil. For very peaty mixes, it is also worth asking whether they belong in a raised bed at all (see below).
5. Consider a wetting agent for stubborn patches. A wetting agent is a surfactant that lowers water’s surface tension so it spreads and soaks in rather than beading up. Products vary by country, so follow the label on any commercial product, and check what is permitted where you live, especially around food crops.
6. Mulch once it is wet. A layer of mulch slows evaporation and helps stop the bed drying past the point where it turns repellent again. Keep it loose. Heavily compacted mulch can shed water too, and turning or fluffing it improves penetration.
What a wetting agent will and won’t do
A wetting agent is a tool, not a cure. If drops already vanish within a second or two, the soil is wetting normally and a wetting agent won’t improve it. Used on genuinely repellent soil, it helps water get in. But repellency can come back. Repeated drying and rewetting of treated sand degraded product performance across several cycles in one study. Extension advice agrees on the underlying point: no wetting agent solves the problem of letting the mix get too dry again.
Yucca extract. Yucca extract is a plant-based wetting agent made from saponins, and it is sold as an alternative to synthetic surfactants. Like any wetting agent, it helps water enter dry soil but does not stop the bed from drying out again. Manufacturers describe it as suitable for gardens, but follow the product label and check that it is allowed for edible beds where you live.
About the dish soap trick. You will see it everywhere. Extension guidance does mention a few drops of dish soap to make seed-starting mix easier to wet. Another gardening source advises a mild, fragrance-free, biodegradable soap in very small amounts, and warns that heavy degreasers or additives can harm soil life. If you try it, keep it minimal, use a plain product, and rinse the bed with plain water afterward. Published ratios vary widely and no universal number exists, so treat any figure you read online with caution. On a food-growing bed, a purpose-made product used per its label is the more predictable route.
When to rebuild instead of rescue
Sometimes the fill is the problem. Consider replacing or reworking it if:
- the mix is mostly peat and re-dries into a crust or a shrunken block within days of watering
- you have distinct layers that block water movement
- repeated soakings only ever wet the top few inches
The extension specialist above recommended blending very peaty bagged mix about half and half with garden soil as a workable compromise. Extension guidance also notes that ornamental beds generally do well with roughly 4 to 6 percent organic matter, a useful reminder that more organic matter is not automatically better, and that well-decomposed compost is the more reliable ingredient. Coir is another option. It is described as a renewable alternative to peat that absorbs water readily even when very dry. Blend it with compost and mineral soil rather than using it alone.
What not to do
- Don’t flood it. Water pooled on a repellent surface mostly leaves through the edges, and you end up wasting it.
- Don’t assume a wet surface means a wet bed. Dig and check before deciding it is fine.
- Don’t fertilize a dry, stressed bed. Rewet first, and let roots recover before feeding.
- Don’t till hard. Excess disturbance dries the soil further and can wreck structure. Loosen gently.
- Don’t mix random amendments in a panic. Extra sand, or large amounts of fresh, raw organic matter, can create new problems. Compost that is well decomposed is safer.
Will the plants recover?
Often, yes, if the roots are still alive. Plants that wilt in dry soil but perk up within a day or two of proper rewetting usually rebound. Plants with crispy, brown foliage, or roots that are dry and brittle when you inspect them, may not. Give it a week or two of consistent moisture before deciding. Leaves already damaged will not heal, but new growth tells you the roots are working again.
Preventing it next season
Prevention is mostly about never letting the bed dry out completely.
- Check by digging, not by looking. Push a trowel down a few inches once or twice a week in hot weather.
- Keep organic matter in the fill. Microbial activity is what breaks down water-repelling compounds, and drought conditions suppress it. Well-finished compost feeds that activity and improves water holding.
- Use drip or a soaker hose. Slow, steady water suits the soil better than intermittent overhead blasts, and reduces runoff.
- Consider buried clay pots (ollas). Filled with water and sunk into the bed, unglazed clay pots release moisture slowly into the surrounding soil as it dries, which helps keep the root zone from drying out and shrinking away from the frame. The guide to irrigating with ollas from University of Arizona Extension explains how they work. They help keep soil moist rather than rewet soil that already repels water, so rewet the bed first.
- Mulch every bed to slow drying between waterings.
- Plan for absences. Before a holiday or a heat wave, water deeply, add mulch, and set up a timer.
- Pick the fill with care. When building a new bed, favor a blend of mineral soil and finished compost over straight peat-heavy bags.

Quick questions
Will rain fix hydrophobic soil? Light rain often won’t. It hits the surface and runs off. A long, slow soaking is a different story.
Can I just water more often? More frequent, shallow watering doesn’t reach the dry zone. Slower, deeper watering does.
Is compost itself hydrophobic? It can be if it has dried out and gone dusty, but well-finished compost that stays moist usually wets easily. Moisten it before working it into the bed.